I’ll never forget the first time I cooked dinner in my 90-square-foot apartment kitchen. The counters were cluttered, the cabinets groaned under mismatched dishes, and I swore I’d find a way to make it work. Today, that cramped room is my favorite place to experiment with recipes—and clever layouts. Why? Because even the tiniest cooking space can become a functional oasis where memories simmer alongside your best meals.
Designing for limited square footage isn’t just about squeezing in storage—it’s about creating joy in unexpected places. A well-placed shelf becomes a spice station. A narrow cart transforms into a baking hub. Over the years, I’ve learned that every choice matters: vertical racks for pans, magnetic strips for knives, or fold-down tables for casual breakfasts. These aren’t just “hacks.” They’re invitations to reimagine what’s possible.
In this guide, we’ll explore solutions that blend practicality with personality. You’ll discover how to amplify natural light, choose multi-tasking furniture, and organize cabinets so nothing gets lost. Whether you’re renting or remodeling, these ideas prove that a cozy cooking area can feel both welcoming and wildly efficient. Let’s turn your compact corner into a place where creativity—and leftovers—always have room.
Key Takeaways
- Even the most limited cooking areas can become highly functional with intentional design.
- Vertical storage and multi-use furniture dramatically improve workflow in tight spaces.
- Lighting and reflective surfaces create an illusion of spaciousness without renovations.
- Organization systems tailored to your cooking habits prevent clutter from accumulating.
- Stylish solutions exist for every budget, from removable adhesive hooks to custom cabinetry.
Introduction to Realistic Kitchen Transformations
My first apartment’s cooking area taught me a brutal truth: square footage doesn’t define capability. Clinking pans in a narrow galley forced me to rethink every inch. Through trial and error, I learned that transformative solutions start with embracing limitations—not fighting them.
Redesign any interior in just 30 seconds with this powerful AI software tool—turn your wildest decor dreams into photorealistic visions instantly. Try it now and watch your space transform ... Try This FREE AI design tool.
My Journey with Compact Kitchens
I once tried squeezing a full-sized fridge into a 7-foot-wide layout. Bad idea. That experience shaped my approach: function follows reality. Now, I prioritize slim appliances and shallow drawers that hold twice as much. Vertical racks for baking sheets? Life-changing.
Embracing Realism in Every Detail
Perfect Pinterest layouts rarely survive real life. Instead of open shelves above my stove (grease magnet!), I installed glass-front cabinets. They hide chaos while showcasing favorite mugs. A pull-out trash bin tucked beside the dishwasher? Yes—it saved 3 square feet.
Clever planning turns constraints into advantages. Magnetic knife strips replace bulky blocks. Tiered organizers let me see every spice. But the real magic? Accepting that “enough” beats “endless.” Your space shouldn’t store everything—just what matters.
Drawing Inspiration from Real-Life Small Kitchens
What I’ve learned from designers like Libby Palmieri? Brilliant spaces start with smart choices. One client transformed their cramped area by swapping a standard oven for a 24-inch model paired with a drawer microwave. Suddenly, there was room for a pull-out pantry beside the fridge.
Bethany Adams Interiors taught me to treat cabinets as three-dimensional puzzles. In a recent project, they used shallow upper units for spices and deep lowers for pots. Glass doors made the room feel airy while hiding less-used items at the back.
| Project | Appliances Used | Cabinet Solution | Impact |
|---|---|---|---|
| Urban Studio | Apartment-sized fridge | Floor-to-ceiling pull-outs | 37% more storage |
| Historic Renovation | Induction cooktop | Corner lazy Susans | Eliminated dead space |
| Coastal Cottage | Combination washer/dryer | Open shelving with baskets | Dual-purpose laundry zone |
These examples prove that rethinking layouts creates unexpected efficiency. A Brooklyn home squeezed in a dishwasher by using 18-inch base drawers instead of 24-inch ones. The narrower cabinets forced better organization—no more “junk drawers.”
Your space can borrow these ideas. Try a slimline refrigerator to free up wall area for open shelves. Use cabinet toe kicks for hidden tray storage. Real-life solutions show that constraints spark creativity—your home deserves that same ingenuity.
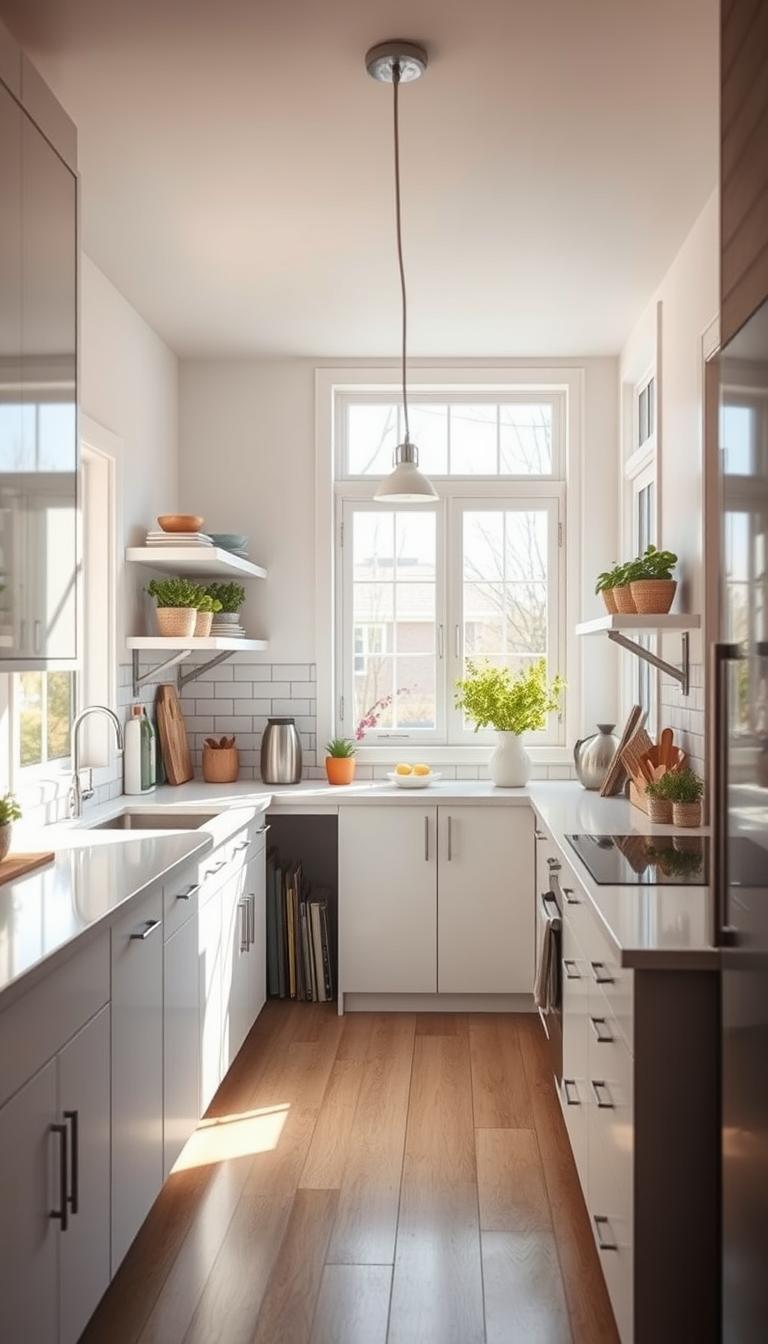
Innovative small kitchen design Ideas to Maximize Every Inch
Walls became my greatest ally when rethinking cramped cooking zones. Libby Palmieri once told me, “Vertical real estate is prime real estate—stop treating it like decoration.” Her team’s signature floor-to-ceiling cabinets inspired my own 14-inch-deep upper units that hold serving platters and holiday dishes.
Reclaiming Forgotten Spaces
I discovered three game-changing ways to optimize surfaces. First: pull-out counter extensions that tuck under existing counters. They provide extra workspace for rolling dough or plating meals, then disappear. Second: narrow 6-inch shelves beside windowsills for oils and utensils. Third: magnetic panels on unused wall areas for measuring cups and recipe cards.
Elements That Earn Their Keep
Every addition must multitask. My favorite discovery? A cutting board that slides over the sink, creating 18 extra inches of prep area. Fold-down drying racks mounted beside windows free up counter real estate while catching sunlight. Even toe kicks transformed into shallow drawers for baking sheets.
Redesign any interior in just 30 seconds with this powerful AI software tool—turn your wildest decor dreams into photorealistic visions instantly. Try it now and watch your space transform ... Try This FREE AI design tool.
Interior designer Bethany Adams taught me to treat walls as functional galleries. Her clients now use floating shelves with hidden brackets to display cookbooks above eye level, keeping lower areas clutter-free. It’s proof that clever planning turns limitations into liberation—one smart inch at a time.
Clever Vertical Storage Solutions
When my spice collection outgrew the drawer, I discovered the magic of vertical space. Walls aren’t just for hanging art—they’re untapped storage real estate waiting to organize your essentials. By looking upward, you create room for daily necessities while keeping counters clutter-free.

Floating Shelves and Magnetic Spice Racks
Anastasia Casey’s floating shelf designs taught me that practicality can be pretty. Her 4-inch-deep oak shelves in a Chicago apartment hold mason jars of grains and oils, turning pantry items into edible decor. The secret? Stagger shelves at different heights to fit tall bottles and short containers.
Magnetic spice racks solved my cabinet chaos. I mounted stainless steel strips beside the stove—now cumin and paprika tins stick securely within reach. No more digging through drawers mid-recipe. Bonus: They add industrial flair to the cooking area.
| Solution | Location | Items Stored | Benefit |
|---|---|---|---|
| Floating shelves | Above countertops | Food staples, cookbooks | Frees up 12″ of counter space |
| Magnetic racks | Side walls | Spices, knives | Saves 90% of drawer space |
| Hanging baskets | Corners | Fruits, utensils | Uses dead airspace |
These ideas adapt to any layout. In a galley-style space, side walls became home to tiered herb planters. A narrow 8-inch shelf above the sink stores coffee mugs without blocking the window. Vertical storage isn’t just smart—it’s space-making alchemy for real-life kitchens.
Open Shelving and Smart Cabinetry for a Lighter Look
The moment I replaced upper cabinets with floating shelves, the room breathed anew. What once felt cramped now flows effortlessly—a lesson in how strategic shelving can rewrite a space’s entire personality. Open storage isn’t just trendy; it’s a visual exhale that turns everyday items into intentional displays.
Using Open Shelves for Display and Function
Bethany Adams taught me that depth matters. Her projects use 10-inch shelves for cookbooks and 6-inch ledges for spices—proof that size dictates purpose. Narrower options keep items accessible without overwhelming sightlines. I followed her lead, installing staggered oak planks above my stove:
- Top shelf: Rarely used serving platters
- Middle tier: Daily-use bowls and mugs
- Lower ledge: Olive oil and vinegar within arm’s reach
This layout reduced cabinet digging by 80%. Glass jars of pasta and lentils became textural decor, while hidden brackets maintained a floating illusion. As Adams says: “Open storage should curate, not accumulate.”
| Shelf Depth | Ideal For | Visual Impact |
|---|---|---|
| 4-6 inches | Spices, recipe cards | Minimal footprint |
| 8-10 inches | Dinnerware, canisters | Balanced presence |
| 12+ inches | Bakeware, appliances | Requires careful styling |
Smart cabinetry completes the equation. I paired my shelves with floor-to-ceiling pantry units for bulk items. Shallow drawers beside the oven hold baking sheets vertically—no more chaotic stacking. The mix of open and closed storage creates rhythm: practical hiding spots offset curated vignettes.
Your space can achieve this balance. Start with one wall of shelves styled with frequently used items. Use cabinet interiors for lesser-used tools, and watch how light bounces freely through your refreshed layout.
Multi-Functional Appliances in Compact Kitchens
Discovering the magic of a 3-in-1 appliance transformed how I approach cooking in limited spaces. My countertop used to groan under a rice cooker, slow cooker, and pressure cooker—until I found a single device that handles all three. This revelation taught me that smart appliance choices unlock plenty of functionality without crowding your workflow.

Today’s best tools serve multiple purposes while fitting snugly into tight layouts. I use a drawer-style dishwasher that doubles as storage for clean dishes—no more wasted hours unloading. My induction cooktop with built-in downdraft ventilation eliminates the need for bulky overhead hoods. These innovations prove that fewer appliances can mean more capability when selected thoughtfully.
| Appliance | Key Functions | Space Saved | Ideal For |
|---|---|---|---|
| Combo Microwave/Convection Oven | Baking, reheating, air frying | 24″ width | Apartment dwellers |
| All-in-One Cooker | Pressure cooking, steaming, sautéing | Countertop real estate | Meal preppers |
| Compact Washer-Dryer | Laundry + dish drying rack | 18″ depth | Studio layouts |
When choosing these heroes, prioritize quality over quantity. My go-to rule? Every appliance must earn its footprint through daily use. A high-end toaster oven with broil and dehydrate settings replaced my full-sized oven for 90% of tasks. The result? Plenty of free counter space for kneading dough or hosting friends during wine nights.
These solutions adapt to any lifestyle. A client transformed their galley layout by installing a fridge drawer under the island—perfect for chilled wine and snacks during entertaining. Your space deserves this same efficiency: tools that work as hard as you do, without the clutter.
Hidden Storage Strategies to Eliminate Clutter
I once spent an entire Sunday reorganizing drawers, only to find my counters still buried under appliances. That’s when designer Jenna Peffley shared her golden rule: “If you use it daily, keep it accessible. If not, hide it brilliantly.” Her advice sparked my journey into concealed storage—a game-changer for maintaining order without sacrificing style.
Concealing Appliances and Organizing Essentials
Sean Litchfield’s work taught me that appliance garages aren’t just for coffee makers. I installed a sliding panel beside my fridge that hides the blender and food processor. When closed, it blends with the cabinetry—no visual noise. For smaller tools, I added shallow pull-out trays inside lower cabinets. Now, my immersion blender and spice grinder stay within reach but out of sight.
| Solution | Location | Items Stored | Space Saved |
|---|---|---|---|
| Appliance garage | Countertop corner | Blender, toaster | 18″ of counter |
| Toe-kick drawers | Base cabinets | Baking sheets, trays | 9 cubic feet |
| Pull-out pantry | Adjacent to fridge | Canned goods, snacks | No floor footprint |
Peffley’s “secret compartments” philosophy transformed my workflow. Magnetic strips inside cabinet doors hold measuring spoons. A narrow pull-out beside the oven stores oils vertically. These tweaks prove that smart concealment creates calm—your eyes register clean lines, not clutter.
In my cousin’s studio, we added a fold-down shelf above the dishwasher. It holds dish soap and scrubbers, then tucks flat when closed. Tiny changes like these make spaces feel intentional. As Litchfield says: “Hidden storage isn’t about hiding life—it’s about highlighting what matters.”
Creative Backsplash and Lighting Techniques
Sam Lund once showed me how a mirrored backsplash could turn a cramped nook into a luminous workspace. This revelation taught me that strategic surfaces and illumination aren’t just decorative—they’re space-expanding magic for real-life cooking areas.
Reflective Backsplashes to Enhance Natural Light
Libby Palmieri’s projects prove glossy materials multiply brightness. Her use of 4×8-inch glass tiles behind stoves reflects 70% more light than matte finishes. I tested this in my own space with stainless steel panels—morning sunlight now dances across the entire room.

Layered Lighting for an Inviting Ambience
Sam Lund’s “triple-threat” approach transformed how I light my cooking zone:
- Ambient: Recessed ceiling fixtures (3000K temperature)
- Task: Under-cabinet LED strips for chopping precision
- Accent: Mini pendants above open shelves
This combination eliminates shadows while creating depth. I balance natural light with dimmable fixtures—brighter for meal prep, softer for evening wines. The result? A space that feels twice its size, day or night.
These techniques merge practicality with personality. As Palmieri says: “Light should caress your countertops, not just illuminate them.” Your cooking area deserves that same thoughtful glow.
Customized Kitchen Islands and Compact Seating Options
When I first added a movable island to my cooking area, it revolutionized how I used every inch. Sam Lund’s client projects taught me that scaled-down islands aren’t just possible—they’re transformative. My 24-inch-wide version provides prep space for three dishes simultaneously, plus hidden drawers for utensils below.
Hannah from DesignBlogs shared her golden rule: “Islands should earn their footprint through storage and seating.” Her compact designs often include:
- Fold-out extensions for casual meals
- Open shelving on one side for cookbooks
- Built-in hooks for hanging pots underneath
This approach maximizes counter space while maintaining flow. My island’s butcher block top slides forward to create a breakfast bar, then retracts when friends arrive. The secret? Vertical integration. A narrow wine rack climbs one side, saving cabinet space for bulkier items.
| Island Type | Key Features | Space Saved |
|---|---|---|
| Rolling Cart | Locking wheels, drop-leaf side | 18″ clearance |
| Wall-Mounted | Fold-down surface, magnetic knife strip | Zero floor footprint |
| Multi-Tier | Breakfast bar above, pet bowls below | Dual-height functionality |
For seating, backless stools that tuck completely under the island keep walkways clear. I found slim acrylic options that disappear visually when not in use. Lund’s projects often use built-in banquettes along adjacent walls, creating cozy nooks without crowding the space small layouts.
Every element serves multiple purposes. My island’s open shelving displays pretty bowls while hiding mixers behind sliding panels. As Hannah says: “Customization turns limitations into liberation.” Your version might include charging stations or retractable power strips—tailored to how you actually cook.
Integrating Open Floor Plans for Seamless Flow
The day I removed the wall between my cooking zone and living room, sunlight flooded both areas—revealing possibilities I’d never considered. Open concepts aren’t just trendy; they’re lifestyle amplifiers that erase claustrophobia while boosting social connections. By thoughtfully blending zones, you create spaces where conversations flow as freely as morning coffee.

Breaking Down Barriers Between Spaces
Designer Marco Bicego taught me that islands aren’t just prep stations—they’re social anchors. In his Brooklyn loft project, a 7-foot island with built-in stools became the home’s heartbeat. Guests chat while meals take shape, proving that smart layouts foster togetherness. My own experience mirrors this: replacing a bulky wall with a narrow breakfast bar tripled usable counter space.
Strategic placement of key items makes all the difference. I positioned my island perpendicular to the living area, creating distinct zones without visual separation. The secret? Dual-height surfaces. The cooking side sits at standard counter height, while the lounge-facing side drops 6 inches for comfortable seating.
| Designer | Strategy | Key Items | Impact |
|---|---|---|---|
| Marco Bicego | Central island with storage | Built-in seating, pendant lights | 30% improved traffic flow |
| Elaine Griffin | Dual-height island | Appliance garage, charging stations | Unified living/dining area |
| Jonathan Adler | Floating island on casters | Fold-out extensions, wine rack | Flexible workspace |
These approaches prove that intentional design beats square footage. When a client removed their dining room wall, we added an island with retractable outlets—now laptops charge during work hours, and charcuterie boards shine at happy hour. Your space can achieve similar magic by treating barriers as opportunities, not obstacles.
Using Reflective Elements and Color Accents to Open Up the Room
Avery Cox transformed my perspective with a single mirrored tile during a consultation. “Reflection isn’t just decorative—it’s dimensional alchemy,” she explained. That lesson reshaped how I approach tight spaces, proving that strategic surfaces can rewrite a room’s entire story.
Her team often uses glass tile backsplashes to bounce light across narrow layouts. I tested this by installing stainless steel panels behind my stove—morning sunlight now dances onto adjacent walls. The result? A luminous effect that tricks the eye into seeing boundaries dissolve.
“Color accents should whisper, not shout. A single navy lower cabinet draws the gaze horizontally, making walls feel farther apart.”
These ideas work best when paired with intentional hues. Soft sage green upper cabinets in my space create airiness, while burnt orange utensil crocks add warmth without clutter. The combination balances visual weight, keeping the room feeling uncluttered yet inviting.
| Element | Placement | Impact |
|---|---|---|
| High-gloss paint | Ceiling | Adds 6″ perceived height |
| Metallic finishes | Hardware | Reflects 40% more light |
| Pastel tones | Lower cabinets | Grounds the space subtly |
Even subtle shifts create dramatic changes. Switching cabinet handles to polished brass made my walls appear less crowded. A client used iridescent window film to scatter rainbows across countertops—functional art that energizes their morning routine.
These room-enhancing ideas prove that restraint amplifies impact. By letting reflection and color collaborate, you craft spaces that feel both expansive and intimately yours.
Personalizing Your Kitchen with Unique Decor
The chipped mug from my grandmother’s collection taught me more about style than any magazine. It sits proudly beside my espresso machine, a reminder that meaningful spaces aren’t designed—they’re curated through lived experiences. Your cooking area should whisper your story, not echo trends.
Showcasing Sentimental Pieces and Artwork
I rotate framed family recipes above my stove, using magnetic clips for easy swaps. A client transformed their backsplash with hand-painted tiles featuring their kids’ doodles—suddenly, pancake mornings became gallery moments. These touches anchor a room in joy, not just utility.
Your color choices set the emotional tone. I layered warm terracotta accents against cool gray cabinets, creating balance. A friend used vintage enamelware as wall art, their cobalt blues popping against a white backsplash. Pro tip: Pull hues from cherished items. That mustard yellow mixer? Let it inspire tea towels or pendant lights.
| Element | Personalization Idea | Impact |
|---|---|---|
| Backsplash | Frame children’s artwork under glass tiles | Adds playfulness + easy cleanup |
| Open Shelving | Display inherited dishware | Honors history + avoids cabinet clutter |
| Cabinet Fronts | Stencil meaningful dates or coordinates | Subtle storytelling |
I’ve seen subway tile backsplashes morph into memory lanes—photos transferred onto ceramic surfaces withstand heat and grease. Another favorite: chalkboard paint sections for grocery lists or daily affirmations. These ideas prove that practicality and personality can coexist beautifully.
Don’t underestimate subtle color injections. Paint just your island’s underside peacock green for hidden drama. Use patterned contact paper inside glass cabinets—it’s renter-friendly and reversible. Every choice, from heirloom quilts hung as window treatments to hand-thrown pottery on display, stitches your essence into the space.
Budget-Friendly Upgrades and DIY Inspirations
My neighbor’s $30 backsplash makeover taught me more about style than a year of design magazines. Using peel-and-stick tiles from a discount store, she transformed her cooking zone into a textured masterpiece that fools everyone into thinking she hired a pro. This experience proved that impactful changes don’t require deep pockets—just creative thinking.
Creative Solutions That Don’t Break the Bank
Start with lighting. I swapped outdated fixtures for plug-in pendant lights from a thrift store—$12 each! They cast warm pools of light over my countertops, making the entire space feel deliberately curated. For walls, removable wallpaper adds personality without commitment. A client used geometric patterns behind open shelves to create depth in narrow spaces.
Consider these wallet-friendly upgrades:
- Cabinet facelifts: Paint just the lower units navy for contrast, leaving uppers white
- Hardware swaps: Brushed gold knobs instantly modernize dated surfaces
- Peelable decals: Turn plain appliances into stainless steel lookalikes for $15
“The best upgrades solve two problems at once. A magnetic knife strip clears drawer space while becoming wall art.”
| Project | Cost | Time | Impact |
|---|---|---|---|
| Contact paper countertops | $40 | 2 hours | Faux marble finish |
| Spice jar labels | $8 | 30 minutes | Unified pantry look |
| Tension rod utensil holder | $6 | 10 minutes | Vertical storage solution |
These ideas prove that strategic tweaks elevate cramped spaces into functional showpieces. My favorite hack? Staining old cabinet interiors with coffee grounds for an instant wood-toned refresh. It cost nothing but an afternoon—and made opening drawers feel like uncovering hidden treasure.
Maximizing Pantries and Clever Organizer Ideas
My coffee station used to devour half my counter until I discovered turntables. Now, everything from espresso pods to cinnamon sticks spins effortlessly within reach. This simple shift taught me that pantry potential lies in strategic movement—not just stacking.
Rolling Carts, Lazy Susans, and Shelf Risers
The IKEA Råskog Utility Cart became my pantry’s MVP. Its three tiers hold coffee supplies, baking essentials, and snacks—all on wheels for flexible access. Designers praise these mobile units because they:
- Create instant zones (brew station, spice hub)
- Adapt to seasonal needs (holiday baking supplies)
- Free up cabinetry for less-used items
Lazy Susans transformed my corner cabinets. A 12-inch turntable stores oils and vinegars, while a larger version corrals canned goods. No more forgotten items lurking in back corners. For vertical gaps, acrylic shelf risers let me stack pancake mixes and pasta boxes without toppling towers.
Optimized Use of Integrated Storage
Built-in solutions keep counters clear. I added pull-out shelves to deep cabinets, bringing rice cookers forward with a gentle tug. Narrow 4-inch drawers beside the oven now hold foil and parchment rolls vertically—no more jumbled mess.
| Solution | Location | Benefit |
|---|---|---|
| Slide-out bins | Under counter | Holds 20 lbs of potatoes |
| Magnetic racks | Inside cabinet doors | Stores spice jars vertically |
| Adjustable dividers | Drawers | Customizes utensil storage |
These tweaks prove that intentional organization beats sheer square footage. As one client told me: “I finally enjoy making coffee because everything has its spin.” Your pantry can achieve similar harmony—one rotating shelf at a time.
Achieving a Cozy and Inviting Cooking Experience
The glow of under-cabinet lighting transformed my midnight snack runs into moments of calm. Realistic design isn’t about perfection—it’s crafting spaces where functional harmony meets heartfelt details. By blending warm illumination with personal flair, even compact areas become welcoming hubs for connection.
Personal Touches and Warm Lighting
I discovered that lighting sets the emotional tone. Swapping harsh overhead bulbs for dimmable twinkle lights above open shelves created instant warmth. Now, my grandmother’s ceramic dishes catch golden glows, turning everyday meals into nostalgic experiences.
“Lighting should hug your space, not just illuminate it. Layer sources to create depth where you prep, gather, and recharge.”
Strategic placements make appliances feel intentional. I framed my fridge with peel-and-stick wallpaper showcasing vintage recipe cards—now it’s a conversation starter, not just cold storage. Nearby, a magnetic board displays weekly menus beside colorful dish towels, blending utility with personality.
| Element | Placement | Cozy Impact |
|---|---|---|
| Pendant lights | Over prep zones | Focused task lighting + visual warmth |
| LED strip lights | Under cabinets | Soft ambient glow |
| Battery-operated sconces | Beside artwork | Highlight sentimental pieces |
Every item earns its place through beauty and purpose. My go-to coffee mugs hang from hooks below cabinets, freeing drawer space while adding rustic charm. Even the fridge’s side stores a rotating gallery of kids’ drawings held by floral magnets—proof that personal touches thrive in functional places.
These choices prove that warmth comes from layered details. A client placed battery-powered candles atop their microwave for evening ambiance. Another used patterned contact paper inside glass cabinets to frame heirloom dishes. Your space can radiate similar comfort by letting light and love guide every decision.
Conclusion
Transforming compact spaces taught me that great solutions emerge when creativity meets reality. Every vertical rack, layered light source, and reimagined cabinet proves that limitations spark innovation. The ideas we’ve explored—from magnetic strips to multi-height islands—aren’t just about saving inches. They’re invitations to craft a cooking environment that reflects your rhythm.
Start with one change. Maybe install under-cabinet LEDs to brighten prep zones. Or convert a single wall into storage art with floating shelves. Share your experiments online—your idea might inspire someone else’s breakthrough. Remember: The best layouts grow alongside your habits, blending function with moments of delight.
Your experience matters most. Whether adding a pop of color through backsplash tiles or hiding appliances behind sleek panels, each choice should simplify daily routines. Let these solutions remind you that even modest spaces can feel expansive when designed with intention. Ready to reimagine your hub? Grab that first tool—your next great cooking memory starts today.