
Let me tell you about the creamiest, most satisfying treat that changed my snack game forever.
A few years ago, I stumbled on a way to combine everyday pantry staples into something that feels indulgent but fuels my body right. Now it’s my secret weapon for quick breakfasts, afternoon pick-me-ups, and guilt-free dessert cravings.
What makes this dish special? It’s ridiculously simple – we’re talking five ingredients and zero cooking. I’ve served it to friends who swore it tasted like a decadent restaurant dessert, never guessing it’s packed with protein and fiber. The magic happens overnight in your fridge, making it perfect for busy schedules.
I’ll show you why this became my year-round staple, from summer picnics to cozy winter nights. You’ll learn my trick for achieving that velvety texture every time, plus how to customize it for different dietary needs. It’s the kind of recipe that makes healthy eating feel effortless and exciting.
Key Takeaways
- Discover a no-bake treat that satisfies sweet cravings while delivering nutrients
- Learn how 5 basic ingredients transform into a luxuriously creamy texture
- Master a make-ahead recipe that simplifies meal planning
- Find out why this versatile dish works for breakfasts and desserts alike
- Get insider tips for perfect consistency and flavor customization
Introduction to My Chia Chocolate Pudding Journey
My journey began with a wrinkled nose and a skeptical spoon. At a friend’s brunch, I encountered my first chia pudding – a gloopy gray mass that tasted like aquarium gravel. “This is health food?” I whispered, scraping my bowl discreetly. But something clicked when I spotted cocoa powder in my pantry weeks later.
From Skeptic to Superfan
Three failed batches taught me everything. Too much liquid? Slimy soup. Not enough? Cement. The breakthrough came at 3 AM, whisking almond milk with just enough sweetener to let the cocoa shine. My food science background helped crack the code: precise ratios create velvet textures, not science experiments.
| Feature | Typical Recipes | My Version |
|---|---|---|
| Base Ingredients | 5-6 components | 4 pantry staples |
| Prep Time | 10+ minutes | 3-minute mix |
| Texture | Gritty or watery | Custard-like smoothness |
| Flavor Boost | Basic cocoa | Layered sweetness |
What makes my recipe different? A dash of sea salt borrowed from salted caramel tricks your tongue into tasting richness. And those edible flower petals on top? They’re not just pretty – they prove healthy and indulgent can share a bowl.
Why I Love This Simple Dessert
This isn’t just dessert—it’s a nutritional powerhouse in disguise. What began as a way to curb my sweet tooth became my go-to solution for energy slumps and rushed mornings. The magic lies in those tiny seeds that swell into creamy perfection while packing serious health perks.
Health Benefits and Satisfying Sweetness
Those unassuming seeds are nature’s multitaskers. Loaded with omega-3s and antioxidants, they fight inflammation while giving skin a healthy glow. I’ve noticed fewer afternoon crashes since making this a breakfast staple – the combo of plant-based protein and fiber keeps me fueled for hours.
Here’s what won me over:
- A single serving delivers 40% of daily fiber needs
- Natural thickeners create richness without heavy creams
- Adapts effortlessly to vegan or gluten-free diets
The real win? It satisfies chocolate cravings while delivering nutrients most actual desserts lack. Friends often ask how something this indulgent can double as a post-workout snack. My secret? Letting the seeds work overnight to develop that custard-like texture everyone loves.
Whether I’m grabbing a jar before sunrise or topping it with berries after dinner, this treat proves wholesome eating doesn’t mean sacrificing flavor. It’s become my edible security blanket – ready when hunger strikes, no guilt required.
Gathering the Ingredients for Perfect Chia Chocolate Pudding
Great results start with smart shopping. While this recipe needs just five staples, each component plays a starring role. Let’s break down what to look for – and why it matters.
Selecting Quality Seeds and Cocoa
Not all chia seeds gel equally. I look for plump, jet-black varieties packed within six months – older stock turns gritty. My go-to brands (like Navitas and Terrasoul) consistently deliver that smooth mouthfeel. For chocolate depth, raw cacao powder beats regular cocoa. It’s less processed, keeping more antioxidants while adding earthy complexity.
Milk Choices That Make a Difference
Your liquid base determines richness. Creamy coconut milk creates dessert-like indulgence, while almond milk keeps things light. Oat varieties add subtle sweetness that pairs beautifully with maple syrup. Dairy works too – whole milk gives classic custard vibes. Pro tip: Shake cartons well before measuring for consistent thickness.
Why these ingredients rock:
- Fresh seeds absorb liquid evenly without clumping
- High-fat milks mimic traditional pudding textures
- Pure maple syrup enhances flavor without overpowering
I stock up during sales – chia seeds last months in airtight jars, and cocoa keeps indefinitely. With these staples ready, I can whip up batches whenever cravings strike.
Preparing the Base Mixture
The foundation of this treat lies in how you combine the ingredients. I’ve tested every method from frantic stirring to high-tech gadgets – here’s what actually works.

Whisking Versus Blending for Perfect Texture
Grab a wide bowl and your trusty whisk for classic preparation. Pour in the milk first to prevent powder clouds, then add cacao and sweeteners. Gentle figure-eight motions incorporate everything without splatters. This method leaves intact seeds for subtle crunch.
Craving silkier results? My blender trick creates mousse-like luxury in 90 seconds. Pulse all components except half the milk initially. Gradually add remaining liquid until it flows like melted ice cream. The blades break down seeds for velvety consistency that feels decadent.
Wait 15 minutes after mixing – this lets the seeds start absorbing liquid. Return for a quick stir to redistribute any settled particles. Pro tip: Run your whisk along the bowl’s curves to catch hidden clumps. Proper hydration here prevents gritty surprises later.
Texture test: Dip a spoon. If it coats evenly without sliding off immediately, you’re golden. Too thick? Add milk one teaspoon at a time. Too runny? Sprinkle extra seeds and wait 5 more minutes. This flexible base adapts to your preferred mouthfeel, from spoonable custard to dip-worthy density.
[amazon bestseller =”chia seeds” items=”1″]
Customizing Your Chocolate Flavor and Texture
The real magic happens when you make this recipe your own. Through countless taste tests, I've discovered how small tweaks create entirely new experiences. Let me walk you through my flavor-building process.
Building Layers of Sweet Complexity
Start with pure vanilla extract – it’s the secret weapon for depth. A quarter teaspoon amplifies cocoa’s richness without overpowering. For sweetness, I swear by grade A maple syrup. Its caramel notes blend better than honey or agave, plus it mixes smoothly into cold liquids.
| Sweetener | Flavor Impact | Texture Effect |
|---|---|---|
| Maple Syrup | Balanced caramel | Silky |
| Honey | Floral notes | Slightly sticky |
| Date Paste | Earthy depth | Denser |
Mastering the Perfect Consistency
Your milk choice determines thickness. I begin with 3/4 cup per serving, adding 1 tablespoon increments until it flows like melted ice cream. Too thick after chilling? Stir in extra milk – it’ll absorb overnight. For dessert versions, I use full-fat coconut milk; breakfast batches get almond milk for lightness.
Three pro tips I live by:
- Always taste before refrigerating – flavors intensify over time
- Add a pinch of salt to make sweetness pop
- Layer mix-ins: Swirl peanut butter or sprinkle cacao nibs
Whether I’m prepping a post-workout snack or fancy dinner finale, these adjustments ensure every bite hits the spot. The best part? No two batches ever taste exactly alike.
Setting the Pudding: Chill Time and Alternatives
[amazon bestseller =”chia seed pudding glasses” items=”1″]
Timing transforms texture in this no-cook treat. Through trial and error, I’ve discovered how rest periods impact everything from mouthfeel to flavor depth. Let’s explore methods to nail the perfect set every time.

Overnight Refrigeration Versus Quick Set Methods
My go-to method? Letting it rest overnight. This slow soak allows seeds to fully hydrate, creating a luxuriously thick base that carries flavors beautifully. The extended time lets sweeteners meld with cocoa for balanced richness – like a fine wine aging to perfection.
Need it faster? Try my 30-minute hack:
- Use chilled liquid straight from the fridge
- Grind half the seeds into powder before mixing
- Stir vigorously every 5 minutes
| Method | Time | Texture |
|---|---|---|
| Overnight | 4+ hours | Custard-smooth |
| Quick Set | 30 minutes | Mousse-like |
Always press plastic wrap directly on the surface before refrigerating. This prevents that unappetizing “skin” while locking in moisture. Check readiness by tilting the container – it should hold shape briefly before slowly sliding.
If your mixture stays watery after 10 minutes, check seed freshness. Old stock loses gelling power. For humid climates, add 1 extra teaspoon of seeds per serving. Meal prep tip: I make three jars every Sunday – they keep beautifully for five days when sealed tight.
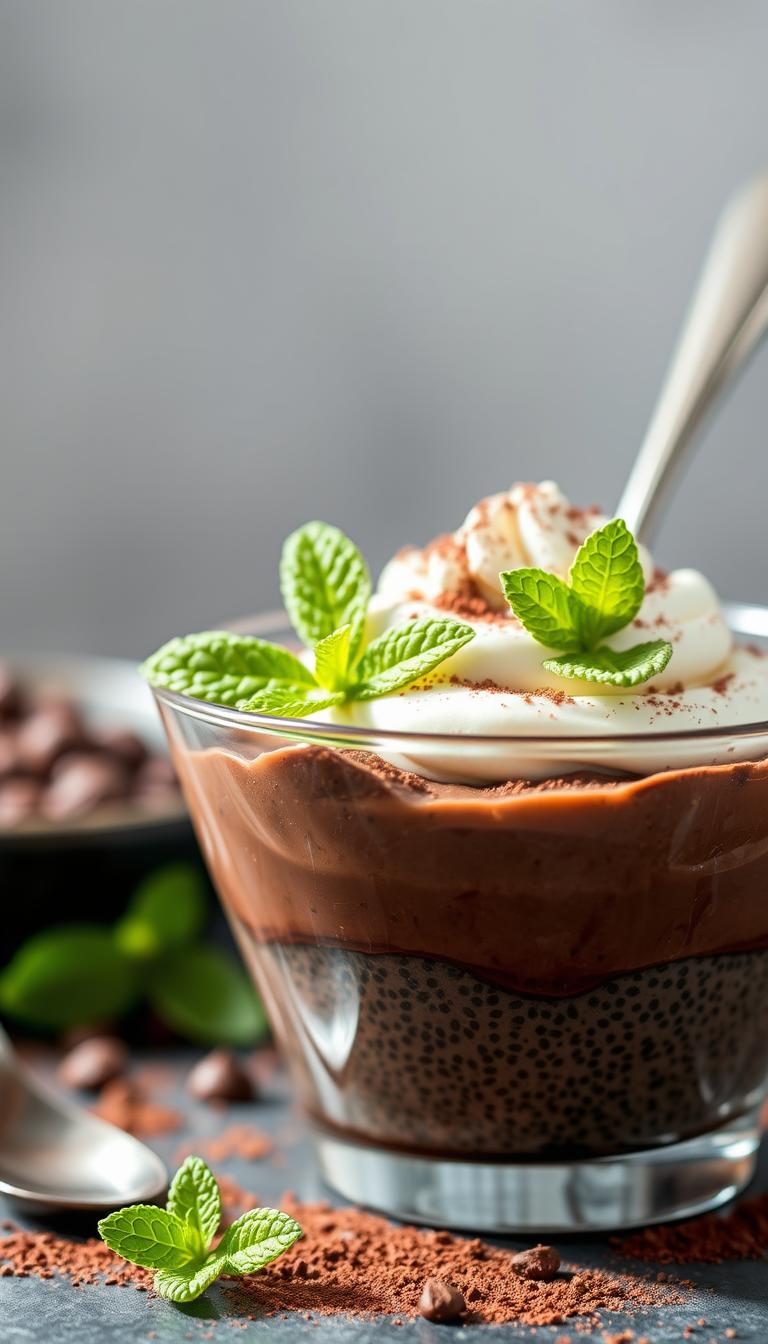
Creative Garnishes and Toppings to Elevate Your Dessert
Transforming a simple dish into a showstopper starts with the perfect finish. The right toppings add texture, color, and flavor bursts that turn everyday treats into memorable experiences. Let me show you how to make each serving feel like a gourmet creation.
Fresh Fruits, Nuts, and Chocolate Shavings
Seasonal fruits balance richness beautifully. Summer calls for macerated strawberries – toss sliced berries with lemon zest and let them sit until juicy. In winter, pomegranate arils add festive crunch. For frosty elegance, freeze rinsed raspberries 10 minutes before plating – they’ll sparkle like edible jewels.
Chocolate curls elevate presentation instantly. Use a vegetable peeler on room-temperature dark chocolate bars. Scatter them asymmetrically across the top for professional flair. Toasted hazelnuts or candied pecans add satisfying crunch. Pro tip: Warm nuts in a dry pan for 90 seconds to intensify their aroma.
Adding a Dollop of Coconut Whipped Cream
My secret weapon? Homemade coconut whip. Chill full-fat coconut milk overnight, then scoop out the solidified cream. Whip with powdered sugar until peaks form – it’s lighter than dairy but equally luxurious. I use it for special occasions or when serving guests who expect decadence.
| Topping | Texture | Best Pairing |
|---|---|---|
| Toasted coconut flakes | Crispy | Tropical themes |
| Salted caramel drizzle | Gooey | Fall gatherings |
| Citrus zest | Zingy | Spring brunches |
Layering matters. Start with crunchy elements at the base, add creamy accents in the middle, and finish with delicate garnishes. This creates visual depth and keeps each bite exciting. Friends always ask for my “sunrise special” – alternating mango slices and edible flowers that mirror dawn colors.
Exploring Variations with Non-Dairy Milks and Health Boosters
Your choice of liquid base can transform this treat from light snack to decadent dessert. Through endless experimentation, I’ve discovered how different milks impact flavor profiles and nutritional value. Let’s break down what works best for various needs and occasions.

Finding Your Perfect Milk Match
Almond milk remains my weekday hero – its subtle nuttiness lets chocolate flavors shine without overwhelming sweetness. When using it, I add an extra teaspoon of seeds to compensate for its thinner consistency. For creamier results, oat milk’s natural thickness creates spoon-standing texture with zero effort.
Special occasions call for canned coconut milk. Its rich fat content mimics traditional custard, though I balance the tropical notes with a pinch of espresso powder. Budget tip: Blend half coconut milk with water to reduce saturated fats while keeping luxurious mouthfeel.
| Milk Type | Fat Content | Best For |
|---|---|---|
| Almond | Low | Daily snacks |
| Oat | Medium | Meal prep batches |
| Coconut | High | Dinner parties |
Power-Up Additions for Nutritional Wins
I boost protein content by stirring in unflavored collagen peptides before chilling – they dissolve completely without altering taste. For post-workout versions, a scoop of chocolate pea protein turns this into muscle-recovery fuel. Always adjust sweeteners when adding powders; their bitterness can sneak up overnight.
Three budget-friendly swaps I love:
- Use store-brand almond milk – flavor differences disappear after chilling
- Mix oat and rice milks for allergen-friendly creaminess
- Add chia seeds gradually to control thickness with any liquid
Whether you’re dairy-free or just curious, these variations prove one recipe can adapt to countless preferences. My current obsession? Cashew milk with a dash of cinnamon – it tastes like Mexican hot chocolate in pudding form.
Tips and Tricks for Perfect Chia Chocolate Pudding
Mastering this recipe comes down to nailing the basics and smart planning. After perfecting countless batches, I’ve discovered simple techniques that guarantee restaurant-quality results every time.
Smooth Results Start Here
Freshness matters more than you’d think. I check expiration dates religiously – older seeds won’t absorb liquid properly. My foolproof method: whisk ingredients in three stages. Mix milk and cocoa first, then add seeds gradually while stirring. Wait 10 minutes, stir again, and you’ll avoid those dreaded clumps.
Watch for these red flags:
- Gritty texture after 2 hours = expired seeds
- Watery separation = insufficient stirring
- Bitter taste = outdated cocoa powder
Make-Ahead Magic
Mason jars became my meal prep heroes. I layer different flavors – vanilla bean on Monday, raspberry swirl for Wednesday. Tight lids keep portions fresh for up to 7 days. Freeze extras in silicone molds for quick thaw-and-go snacks later.
| Storage Method | Duration | Texture After Thawing |
|---|---|---|
| Refrigerator | 4-7 days | Creamy |
| Freezer | 3 months | Slightly denser |
My rotation system ensures nothing goes to waste. Color-coded labels show preparation dates and flavor variations. Every Sunday, I move older jars to the front – visual reminders to enjoy them first. This strategy keeps my breakfasts exciting and my fridge organized.
Conclusion
This versatile creation became my kitchen’s unsung hero. What started as a skeptical experiment now fuels my mornings and satisfies late-night cravings equally. The beauty lies in its simplicity – five minutes of prep yields a nutrient-packed treat that feels indulgent.
I love how easily it adapts. Swap milks based on what’s in your fridge, or adjust sweetness with a drizzle of maple syrup. Those tiny seeds work magic overnight, transforming into a creamy base that’s perfect for layering fruits or crunchy toppings.
Pro tip: Double the batch on Sundays. Portion it into jars for grab-and-go breakfasts or post-workout fuel. Friends still can’t believe something this satisfying requires zero cooking.
Feel free to make it your own. Add espresso powder for mocha vibes, or blend in avocado for extra richness. If you try a twist that wows your crew, let me know! I’m always hunting for new flavor combos to test.
Whether you need a quick snack or elegant dessert, this recipe delivers. It’s proof that good food doesn’t need complexity – just quality ingredients and a little patience.
FAQ
Can I swap maple syrup with another sweetener?
Absolutely! I often use honey, agave, or date syrup. Adjust quantities to taste—just ensure it blends well with the cocoa for balanced sweetness.
How do I prevent clumps in my pudding?
Whisk vigorously right after mixing the base, or blend everything for a silky texture. Letting it sit for 5 minutes, then stirring again, helps too!
What’s the shortest chill time possible?
While overnight refrigeration gives the best results, 2–3 hours works in a pinch. For a quicker set, pop it in the freezer for 30 minutes (stir halfway).
Can I use frozen fruit as a topping?
Sure! Thaw berries or mango first to avoid excess moisture. I prefer fresh fruit for crunch, but frozen works if you’re in a hurry.
Does oat milk change the texture compared to almond milk?
Oat milk creates a creamier result, while almond keeps it lighter. Both work—I alternate based on whether I want richness or a airier feel.
How long does this stay fresh in the fridge?
Store it airtight for up to 5 days. The seeds hold up well, but add toppings like nuts or coconut flakes just before serving to keep them crisp.
Can I add protein powder to boost nutrition?
Yes! Blend 1–2 tablespoons into the mixture. Opt for unflavored or vanilla varieties to avoid overpowering the cocoa. Adjust milk if it thickens too much.