
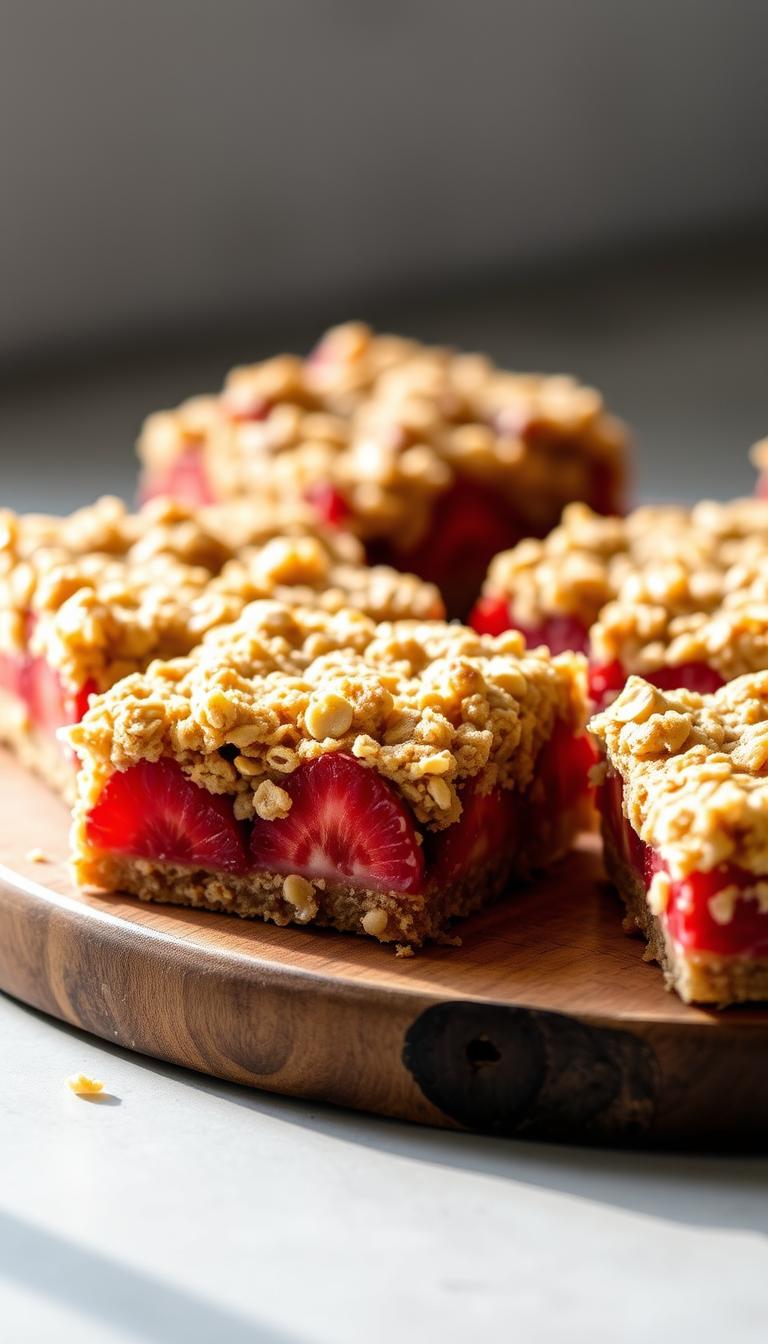
I’ve spent years perfecting this simple yet irresistible treat, and now it’s become a reader favorite. These bars blend a buttery oat crust with a sweet, jammy filling for a dessert that’s as versatile as it is delicious. Whether you use fresh or frozen fruit, the result is always a crowd-pleaser.
What makes this recipe special? It’s all about simplicity. With just one bowl and minimal prep, you’ll have a batch ready in no time. Each serving packs flavor without the guilt—coming in at around 100 calories. Plus, it’s easy to adapt for gluten-free or vegan diets.
Perfect for spring picnics or summer potlucks, these bars shine with seasonal fruit. The contrast between the crisp oat topping and the juicy center is pure magic. Trust me, even beginner bakers can nail this recipe on the first try!
Key Takeaways
- Quick one-bowl prep saves time and cleanup.
- Only 100 calories per serving for a guilt-free treat.
- Works with fresh or frozen fruit for year-round ease.
- Gluten-free and vegan options available.
- Ideal for breakfast, snacks, or dessert.
Why You’ll Love These Strawberry Oatmeal Bars
Baking should be simple, and these bars prove you don’t need fancy tools for amazing results. With just a bowl and a spatula, you’ll whip up a treat that’s equal parts wholesome and irresistible.
No mixer? No problem. Melted butter blends effortlessly into the oat crust, skipping the fuss of creaming. Whole wheat flour adds nuttiness, while fresh fruit keeps the sweetness natural.
- One-bowl magic: Mix crust and topping together—less cleanup, more time to enjoy.
- Smart swaps: Drizzle with glaze for extra decadence or pair with yogurt for a lighter bite.
- Built for sharing: One batch feeds a crowd, and they travel perfectly to picnics or potlucks.
- Freezer-friendly: Bake ahead and stash slices for cravings that strike anytime.
Love a hint of tartness? Fold in extra berries. Prefer crunch? Toasted nuts work wonders. These bars adapt to your taste—no strict rules, just delicious flexibility.
“The oat crust is genius—crispy outside, tender inside. My kids think it’s dessert, but I love that it’s packed with fiber.”
Whether you serve them warm with ice cream or grab one on the go, they’re a win. Simple, satisfying, and secretly good for you—what’s not to love?
Ingredients for Strawberry Oatmeal Bars
Every great recipe starts with quality ingredients, and these treats are no exception. Here’s what you’ll need to create the perfect balance of crisp crust and juicy filling—plus easy swaps for dietary needs.
For the Oat Crust & Topping
Rolled oats give the best texture—chewy yet sturdy. Quick oats work too but yield a softer bite. Combine them with flour (all-purpose, white whole wheat, or gluten-free blend) and brown sugar for sweetness.
Butter binds everything together. For vegan bars, swap in coconut oil. Pro tip: Use room-temperature butter for easier mixing. You’ll need about 14 tablespoons for a 9×13 pan.
For the Strawberry Filling
Fresh strawberries shine here, but frozen work in a pinch. Toss them with a bit of cornstarch to thicken the juices and a squeeze of lemon to brighten the flavor. No need for extra sugar if your berries are ripe!
- Flour options: Regular, whole wheat, or gluten-free 1:1 blends all work.
- Butter alternatives: Coconut oil keeps it dairy-free.
- Filling tweaks: Add a pinch of salt to balance sweetness.
“The cornstarch trick is a game-changer—no more runny filling!”
With these simple ingredients, you’re minutes away from a pan of golden, fruity goodness. Up next: how to assemble and bake them to perfection.
How to Make Strawberry Oatmeal Bars
Ready to bake? This foolproof method delivers crispy tops and jammy centers every time. Just follow these steps—no fancy skills needed.
Step 1: Prep the Crust
Start by melting the butter for easy mixing. Combine it with the oat mixture until crumbly. Press firmly into a parchment-lined pan using a measuring cup. This prevents crumbling and stops soggy bottoms.
Step 2: Layer the Filling
Spread the fruit in two batches for even coverage. A pro tip: toss it with cornstarch to thicken juices. No gaps mean every bite bursts with flavor.
Step 3: Add the Topping & Bake
Reserve ¾ cup of the oat mix for the crumble. Sprinkle it over the filling, then bake at 375°F for 35–40 minutes. Look for bubbling edges and a golden-brown top.
“Pressing the crust with a cup is genius—mine held together perfectly!”
Let the pan cool before slicing. For cleaner cuts, chill briefly in the fridge. Now, enjoy warm or pack for on-the-go snacking!
Pro Tips for Perfect Bars
Skip the guesswork—here’s how to perfect every batch, every time. A few tweaks make all the difference between good and great results.

Prevent sogginess: Measure cornstarch precisely—too little won’t thicken; too much creates gumminess. If using frozen fruit, thaw and pat it dry first. Pro tip: Toss berries with lemon juice to balance sweetness naturally.
Always let bars cool completely before slicing. Chill them briefly for cleaner cuts—a serrated knife glides through without crumbling. Line your pan with parchment paper for easy removal, leaving an overhang to lift them out neatly.
“Chilling changed everything! My slices finally look Instagram-worthy.”
Doubling the recipe? Use a 9×13 pan and add 5–10 minutes to bake time. Store leftovers in an airtight container for 3 days or freeze for up to a month. Wrap slices individually for grab-and-go ease.
- For extra fiber: Swap half the flour for whole wheat.
- Lower-fat option: Replace butter with applesauce (reduce by 2 tbsp).
- No sticking: Grease the pan even with parchment paper.
With these tricks, you’ll avoid common pitfalls and enjoy flawless bars—crisp, juicy, and packed with flavor.
Easy Variations to Try
Customizing this recipe is half the fun—here’s how to make it your own. Whether you’re adapting for dietary needs or just craving something new, these tweaks keep things exciting.
Vegan and Dairy-Free Option
Swap butter with coconut oil for a plant-based crust. Need binding? A flax egg (1 tbsp ground flax + 3 tbsp water) works wonders. The result? Crispy edges and all the flavor—minus the dairy.
For extra fiber, use whole wheat flour. Maple syrup replaces honey, keeping it vegan-friendly. Pro tip: Chill the dough 10 minutes before baking for better texture.
Other Fruit Swaps
Not a fan of strawberries? Try these combos:
- Blueberries: Toss with lemon zest for a tangy kick.
- Peach-mango mix: Perfect for summer breakfast vibes.
- Raspberries: Add white chocolate chips for a decadent dessert.
| Sweetener | Amount | Best For |
|---|---|---|
| Truvia blend | Halve the sugar | Low-calorie option |
| Maple syrup | ¼ cup | Vegan recipes |
| Coconut sugar | Same as sugar | Caramel notes |
“The peach-mango version disappeared in minutes—my kids didn’t even realize it was healthy!”
Don’t stop at fruit. Almond slivers add crunch, or drizzle with a cream cheese glaze for extra richness. The possibilities? Endless.
Serving Suggestions
These treats shine at any time of day—here’s how to serve them for maximum impact. Packed with vitamin C and fiber, they’re as nutritious as they are delicious.

Breakfast boost: Warm a square and pair with Greek yogurt or almond butter. The protein balances the natural sweetness, keeping you full all morning.
Dessert delight: Go classic with vanilla bean ice cream. The contrast of warm fruit and cool cream is irresistible. For a lighter option, drizzle with honey instead.
- Brunch star: Cube and skewer with fresh berries for a colorful platter.
- Kids’ favorite: Skip the glaze and pack in lunchboxes—they’ll love the chewy texture.
- Party trick: Dust with powdered sugar or add edible flowers for a fancy twist.
| Occasion | Pairing | Pro Tip |
|---|---|---|
| Morning | Low-fat yogurt | Add chia seeds for crunch |
| Dessert | Ice cream + mint | Use a melon baller for mini scoops |
| On-the-go | Airtight container | Layer with parchment to prevent sticking |
“The yogurt combo is my weekday hack—it feels indulgent but fuels my workouts!”
No matter how you serve them, these bars adapt. Store leftovers in a container for up to 3 days, or freeze for future cravings. Next up: keeping them fresh longer.
How to Store and Freeze
Keeping your treats fresh is just as important as baking them—here’s how to do it right. With these simple tricks, you’ll enjoy that just-baked taste days (or months) later.
First rule: Always let bars cool completely before storing. This prevents condensation that leads to sogginess. I usually wait 2 hours on a wire rack.
For short-term storage:
- Room temp: Keep in an airtight container for up to 2 days. Layer with parchment paper to prevent sticking.
- Fridge: Extend freshness to 1 week. Microwave for 10 seconds to revive that warm, gooey texture.
“Freezing changed my meal prep game—now I always have homemade snacks ready!”
Freezer-friendly tips:
- Wrap individual portions in parchment-lined containers to avoid freezer burn.
- Unglazed bars freeze best—add toppings after thawing.
- Label with dates; they’ll keep for 3 months.
Thaw overnight in the fridge for perfect texture. Need them fast? A quick 15-second microwave zap does the trick. Now you’re ready for anytime cravings!
Conclusion
Simple ingredients, big rewards—that’s the magic here. With just 10 pantry staples and one bowl, this recipe delivers flavor without fuss. Readers love how easily it adapts to diets, from gluten-free to vegan.
Made a batch? Tag #BakeWithUs to share your twist! Craving more? Try our blueberry version next—link in bio.
Stuck or customized it? Drop a comment below. I’ll help troubleshoot or celebrate your wins.
Your new staple awaits—make strawberry magic today!
FAQ
Can I use frozen fruit instead of fresh?
Absolutely! Just thaw and drain excess liquid to avoid a soggy crust. Frozen berries work great in a pinch.
How do I keep the bottom layer from getting too crumbly?
Press the mixture firmly into the pan before baking. This helps it hold together better when sliced.
What’s the best way to cut these without them falling apart?
Let them cool completely first. For clean cuts, use a sharp knife and wipe it between slices.
Can I make these gluten-free?
Yes! Swap regular flour for a gluten-free blend and use certified GF oats. The texture stays just as good.
How long do these stay fresh?
Store them in an airtight container at room temp for 3 days or refrigerate for up to a week.
Can I freeze these for later?
Definitely! Wrap individual portions tightly or layer them with parchment in a freezer-safe container for up to 3 months.
What other fruits work well in this recipe?
Blueberries, raspberries, or even diced peaches are delicious swaps. Adjust sugar based on sweetness.
Why is my filling too runny?
If using juicy berries, toss them with a bit of cornstarch to thicken the filling as it bakes.